Why the pre filter matters more than you think
Every air purifier in a pet household fights a daily storm of fur, dust and dander. When the pre filter is neglected, that storm hits the expensive HEPA filter directly and air purifier pre-filter cleaning maintenance quickly turns from a simple habit into a costly problem. If you want clean air and the best air quality for your family and animals, you must treat the pre filter as the first line of defense rather than an optional accessory.
The pre filter layer sits in front of the main HEPA filter and catches large particles such as pet hair, fabric lint and heavy dust bunnies. By trapping this debris, pre filters keep the finer HEPA filters from clogging too fast, which will extend the time between replacement filters and reduce the number of filters replacing events each year. Many manufacturers assume a HEPA replacement interval of 6–12 months in average homes, but that estimate depends heavily on how clean the pre filter stays in real use.
For dog and cat owners, the impact is even sharper because pet hair and dander accumulate on the pre filter surface in a matter of days. A clean pre filter keeps airflow high, helps the purifier maintain its stated Clean Air Delivery Rate and will keep noise and energy use lower over the long term. If you ignore this simple maintenance step, you pay twice, once in higher electricity and once when you must replace HEPA media long before the advertised replacement hepa schedule.
How to tell when your pre filter needs cleaning
Visual and performance clues
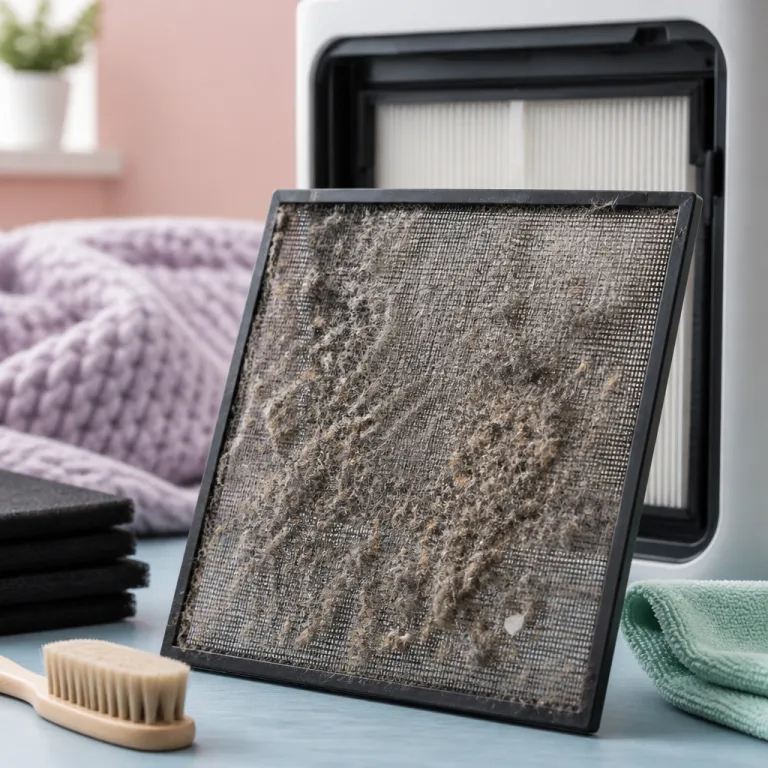
Most air purifiers give you visual clues long before performance collapses completely. When you remove the front grille and see a gray mat of dust, pet fur and fabric fibers stuck together on the pre filter, your air purifier pre-filter cleaning maintenance is already overdue. A healthy pre filter should show a thin veil of dust but still reveal the original mesh or foam structure clearly to the eye.
Changes in sound and airflow are just as revealing as what you see on the filters themselves. If the purifier suddenly seems louder on the same fan speed, or if the air stream from the outlet feels weaker, the motor is pushing against a clogged pre filter layer and HEPA filter efficiency will suffer quietly in the background. In many units, the filter indicator only tracks operating time for the main hepa filters, so you still need to check filter condition on the pre filter section manually every few weeks, especially in homes with multiple pets.
Odor, dust and air quality signals
Pay attention to your nose as well as your ears and hands when judging air quality. If pet odors linger longer than usual or dust settles quickly on furniture despite regular cleaning, the purifier filters are probably not processing enough air volume because the pre filter mesh is blocked. Building a habit of quick cleaning pre checks once a month will keep both the pre filters and the main HEPA filter working together, and this simple routine supports the best air results without constant replacement hepa purchases or emergency maintenance calls.
For a broader look at simple routines that make tabletop units easier to manage, you can read this guide on effortless tabletop air purifier maintenance, then adapt the same mindset to every purifier in your home.
Washing, vacuuming and drying different pre filter materials
Vacuum-safe and washable pre filters
Not every pre filter is built the same way, so the right cleaning method depends on the material. Many fabric pre sleeves and mesh frames are designed for gentle vacuuming with a soft brush, while some foam style pre filters tolerate rinsing under lukewarm water if you keep the motion light. Always check the manual before you clean, because washing a non washable pre filter layer can warp the frame, shed fibers into the hepa filter and will reduce overall performance instead of improving it.
For vacuum safe pre filters, hold the nozzle a few centimeters away and move slowly to remove dust, pet hair and larger debris without pulling or tearing the fabric. This kind of air purifier pre-filter cleaning maintenance is quick, keeps the pre filter surface open and helps the purifier maintain strong airflow through both the pre and HEPA filters, which in turn delays the need to replace HEPA cartridges and other replacement filters. When you work on cleaning pre filter layers that can be rinsed, use low pressure water, avoid harsh soaps and always shake gently to remove excess water before you let the filter dry completely on a clean towel.
Drying, safety and mold prevention
A pre filter that goes back into the purifier while still damp will encourage mold growth and send musty odors into the room instead of clean air. Make sure the filter feels fully dry to the touch on both sides and along the edges, then wait an extra hour to be safe before reinstalling it in any air purifiers you own. If you are unsure whether your hood style intake or other specialty purifier filters can be washed or only vacuumed, look for guidance from technical resources that explain the role of hood filters in air purification and apply the same cautious approach to your specific model.
How a dirty pre filter silently ruins HEPA performance and your budget
Airflow, CADR and hidden strain
When the pre filter layer is clogged, the problem is not only visible dust but hidden strain on the entire air system. The fan must pull air through a thick mat of debris before it even reaches the hepa filter, so less air passes through the purifier per minute and the real clean air output falls below the rating printed on the box. Many room purifiers are tested under standards such as AHAM AC-1 to determine Clean Air Delivery Rate, but those ratings assume clean filters, not a pre filter packed with pet hair and lint.
A starved HEPA section also loads unevenly, because air finds the few remaining open paths and forces more dust into narrow channels of the hepa filters. This uneven pattern means you will see dark streaks on the filter pre side when you finally replace HEPA cartridges, and those streaks are a sign that you waited too long between cleaning pre sessions on the front layer. Over time, this neglect will push you toward more frequent replacement hepa purchases and more filters replacing cycles than the manufacturer estimates, especially in homes with several shedding pets.
Design trade-offs and long term costs
Some brands even design their air purifiers with pre filters that are hard to access or officially non washable, which nudges owners toward buying full replacement filters or new machines instead of practicing simple maintenance. If your model makes it difficult to reach the pre filter section, factor that into your long term cost calculations and consider whether another air purifier with easier access might offer the best air value for your budget. When comparing models and purifier filters options, resources that explain how to choose the right filter for your air purifier can help you weigh pre filter design, HEPA quality and replacement schedules together rather than in isolation.
Practical monthly routine for pet owners and heavy use homes
Suggested pre-filter maintenance schedule
A simple calendar reminder is often all it takes to turn air purifier pre-filter cleaning maintenance into a habit instead of a chore. For homes with one pet and moderate dust, aim to check filter condition and clean the pre filter layer every four weeks, then adjust the time interval if you see heavy buildup sooner or later. Households with multiple dogs or cats, open windows or nearby construction usually need to clean pre filters every two weeks to keep dust and fur from choking the purifier.
Quick three-step checklist
Turn that advice into a short checklist so the process stays quick and consistent. Step one: switch off and unplug the purifier, then remove the front grille and lift out the pre filter. Step two: inspect both sides for mats of fur or gray dust and either vacuum or rinse the pre filter according to the manual. Step three: let the pre filter dry completely if washed, wipe the housing with a dry cloth, reinstall the clean pre filter and run the purifier on a low speed for a few minutes to confirm normal airflow.
When you finish each session, reset any filter indicator if the manufacturer recommends it after maintenance, then note the date on a small label near the purifier. That simple record makes it easier to check filter age, plan filters replacing cycles and decide when to replace HEPA cartridges instead of guessing based only on color. Over a full year of consistent maintenance, you will usually see longer intervals between replacement hepa orders, fewer dust complaints from family members and a quieter purifier that will keep delivering clean air without straining your wallet.
Choosing the right accessories and replacement filters for long term care
Pre-filter friendly purifier features
Good air purifier pre-filter cleaning maintenance starts with choosing models that support easy care rather than fighting against it. When you shop for a new air purifier, look for clear access to the pre filter, washable or vacuum safe pre filters and a transparent schedule for when to replace HEPA cartridges and other purifier filters. Units that hide the pre filter layer behind multiple screws or sealed panels will make you less likely to clean, which will shorten the life of both the pre and hepa filters and quietly raise your total cost of ownership.
Accessory kits, rotation and replacement intervals
Accessory kits that bundle extra pre filters, a spare HEPA filter and simple cleaning tools can be a smart investment for pet owners who run air purifiers many hours each day. Having a second pre filter on hand lets you swap a dirty one for a clean pre filter panel instantly, then wash and dry the first filter pre at your own pace without leaving the purifier idle. Over time, rotating pre filters and following the recommended time intervals for replacement filters will keep air quality more stable and reduce the stress of last minute filters replacing when an old hepa filter finally reaches the end of its life.
When evaluating these accessories, focus less on flashy marketing and more on how they support consistent maintenance and reliable clean air. The best air value usually comes from a purifier that makes it easy to check filter condition, clean the pre filter layer thoroughly and replace HEPA media only when truly necessary, not from the cheapest replacement hepa pack on the shelf. By aligning your accessories, your cleaning pre routine and your budget, you create a system that will keep your home’s air cleaner, your pets more comfortable and your wallet noticeably happier over the long run.
FAQ
How often should I clean the pre filter in a pet household ?
Most pet owners should plan to clean the pre filter every two to four weeks. If you have multiple shedding animals or notice heavy dust on the mesh sooner, shorten the interval to every two weeks. The goal is to keep the pre filter layer visibly clear so the hepa filter can focus on fine particles instead of catching pet hair.
Can I wash my pre filter with soap and water ?
Some pre filters are washable, while others should only be vacuumed, so always read the manual first. If washing is allowed, use lukewarm water, a tiny amount of mild detergent and very gentle handling to avoid damaging the fibers. Let the filter dry completely before reinstalling it, because any remaining moisture can promote mold and odors inside the purifier.
Does cleaning the pre filter really extend HEPA filter life ?
Yes, regular pre filter maintenance significantly reduces the amount of large debris that reaches the hepa filter. With less hair and coarse dust to trap, the HEPA media clogs more slowly and maintains better airflow for a longer period. That means fewer replacement filters over time and more stable air quality between each replacement.
What are the signs that my pre filter is too dirty ?
Visible mats of dust and pet hair on the pre filter surface are the clearest warning sign. You may also notice weaker airflow from the purifier, higher noise on familiar fan speeds or lingering pet odors in the room. Any of these changes suggest it is time to remove the pre filter and give it a thorough cleaning.
Is it safe to run my air purifier without the pre filter installed ?
Running an air purifier without its pre filter is not recommended, especially in homes with pets. Without that first barrier, large particles hit the hepa filter directly, clogging it faster and potentially damaging the media. Always wait until the pre filter is completely dry and properly seated before turning the purifier back on.